

Maine Coon Cat - A pastel tutorial
Drawing a cat in an altered setting.
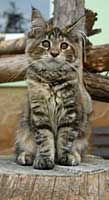
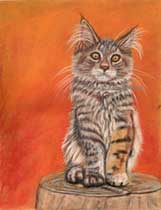
This will be a pastel of a Maine Coon Cat. I selected the reference from the WetCanvas! Reference Image Library. The photo was taken by a member named "Snag." Thank you Snag for sharing!
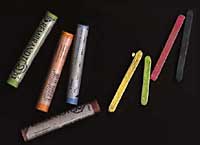
This drawing is on a piece of 11" X 14" sand colored velour paper. I love working on velour. It has a naturally soft surface with a velvety feel to it and it really takes a lot of layers of pastels and cuts down on pastel dust by the nature of its surface. If you're not familiar with pastels they can be toxic so be sure to read about the safety warnings about working with them before you use them. Pastels are made with pure pigment and formed with a clay binder so the colors are gorgeous.
Making a start
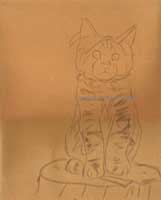
The first thing I do is to put a rough sketch of the cat on my paper with a black Conté pastel stick. Conté pastels are hard square sticks. I use both Conté sticks and Rembrandt soft pastels in my drawings. Rembrandts are considered soft pastels but are harder than most soft pastels and give a bit more control.
When I start to draw any animal or person I draw the eyes in first. I want them looking back at me while working on the drawing - besides it creeps me out to see empty eye sockets! I use mostly Conté sticks for the eyes. I have marked the pupils on the cat and for the iris I've put a ring of green around the edges even though this cat has rather dark golden eyes. If you look at eyes, even yours, they are never just one color. They have flecks of many colors giving them depth and sparkle.
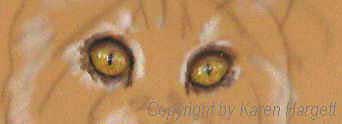
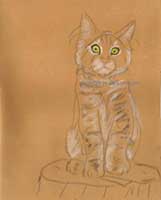
Here I have darkened the outline around the eyes with black then used several golds, oranges, browns and white to fill in the color of the eyes and put in the reflections. The I used a taupe brown color to add a shadow across the top of each eye - this sets the eye in the socket and gives the impression of an eye lid creating a shadow on the eye itself. I have marked areas of white in the fur.
The setting
I decided I just want a plain background so it won't compete with the cat and before going too far with the cat I've added some background color. This will help the cat to be seated well in the drawing and eliminate having to go back and "color" around the cat to put the background in giving it a "halo" look. I have also added more darks with a Rembrandt black pastel and put some of the background colors in the cat.
It is about at this point that I always wonder if I'm doing things right because it is at that ugly stage. I continue to add several shades of browns, beige and white to the cat forming the tufts and patterns in the fur.
Pastels can't be mixed like paint. You just add layer on top of layer letting the under layer show through. So I continue to put cools next to warm colors, darks against light, creating depth and textures. I don't blend too much either but do occasionally rub the color down in to the velour. This will dull the color a bit but more color can be added - at least up to a point.
Eventually the paper won't accept any more color because the pastels have filled the "tooth" of the paper. If you find you need to add a bit more color when the paper won't accept any more you can take a small stiff brush and rough up the surface and remove some of the pastel. One time I even took a vacuum cleaner hose to another drawing to remove some of the pastel - it worked but you need to be very careful!
I have continued to add bits of color all over the cat. I will continue to do this building up color for the fur and create texture.
Additional layers
I'm layering the lighter colors on top of the darker colors and then even taking some of the darker shades and making them even darker creating the fur thickness and texture.
Here you can see I've started on the tree stump that the cat is sitting on.
I used the white Conté stick to make the whiskers and the black to make the little tufts of hair on the tips of the ears. Even though the sticks are square you can use a corner to make really thin lines. If you look closely I've done quite a bit of the finished part of her fur that way too.
I can see looking at the image above there are a few places that need my attention already. That can happen sometimes. I try to hold my work up and take a look at it while I'm drawing because I can get too focused on one area and not see how it is in relation to the drawing as a whole. I think focusing on one area at a time is a good thing though. It allows you to interpret what you are drawing and to make it lifelike and not just a copy of a photo.
One of the corrections I have made is I have reduced the ruff around her neck. I had gotten carried away with drawing the fur and had made it too full. I just used the background color to "erase" the parts I wanted eliminated.
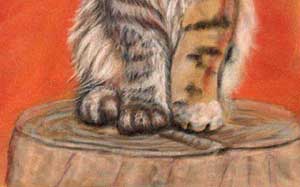
Also I had to do a few adjustments on her right leg. It was too fat and her foot was too far forward. It was easy enough to fix by adding darker pastels underneath her foot and over the bottom of her toes. On the leg it was just a matter of making more shadows and darker hair around the edge of her leg. I added a few shadows on the surface of the tree stump and decided that was enough.
After making the adjustments to the feet I finished out the tree stump. The tree stump was done by layering light and darks - browns, yellows, grays and black until I was satisfied with it. I worked very freely in getting the texture and colors to describe it as a tree stump.
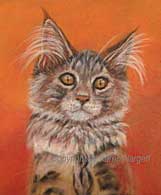
The Maine Coon cat drawing completed
When I'm finished with a drawing, I'll let it sit for a day or two just to see if there is anything that stands out to me that needs to be added or adjusted. Sometimes after working on a drawing for a while you don't see things that need to be corrected or added until you have stepped away from it. At other times all it takes is to see it on screen and those little bits jump right out at you. For all practical purposes though this drawing is finished except for the name.
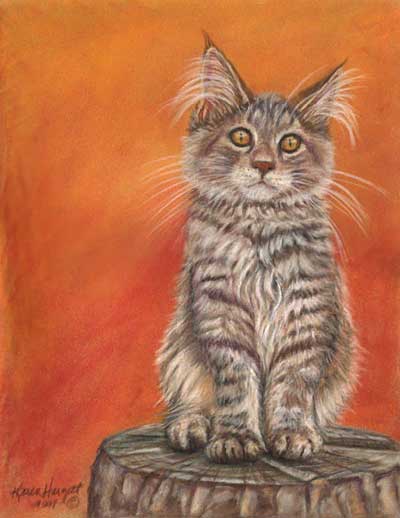
Naming a piece can be a whole lot of fun. Sometimes you have the name before you even start, other times it will come to you while you are drawing. I didn't have her name until I was brainstorming with my sister and we came up with "Charmed - I'm sure". I think it fits don't you?
I hope my explanations have helped you to understand how I draw with pastels when drawing animals.
© Karen Hargett 2008
If you wish to use any of my artwork please e-mail me for written permission